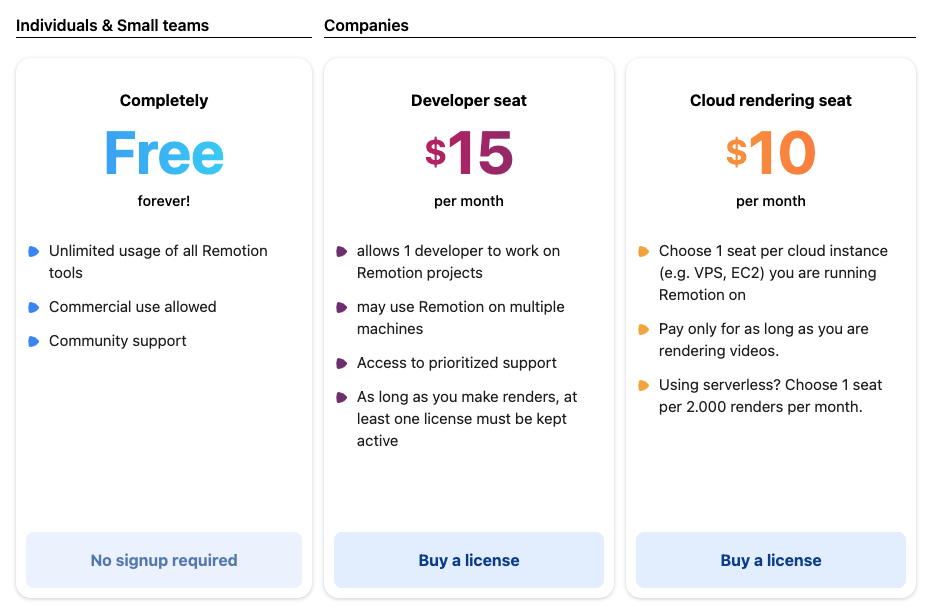
We got rid of the "Contact us for pricing" policy and have announced the pricing for Remotion publicly. Head over to companies.remotion.dev to see it!
This is a new platform where you can directly buy a Remotion license, get invoices, upgrade/downgrade or cancel without having to get in touch with us.
Needless to say, you can still email us if you like a consultation!
Until now, every time you ran yarn create video, a binary of Chromium was installed, which was slow and took a lot of space (between 170-280MB depending on the OS). Making matters even worse, these binaries would not include the codec required to play MP4 videos, meaning if you wanted to embed one, you had to convert it to WebM first.
Now Remotion will try to find an existing installation of Chrome on your machine and if it finds one, it will use it and skip the download. If it doesn't find one, you can specify the path using the setBrowserExecutable() option or the --browser-executable command line flag.
If you are running Remotion on a machine where neither Chrome nor Chromium is installed, Remotion will still download a version from the internet. However, the download only happens when you invoke npm run build for the first time, so you don't have to wait so long before you can start experimenting.
Apple Silicon support is another nice side-effect of the Puppeteer refactor, since previously the installation would fail because no Chromium binaries were available for the Apple Silicon architecture. Now that Remotion will try to use the local Chrome installation this is way less likely to happen.
On Windows Subsystem for Linux, a missing flag would lead to Remotion getting stuck during rendering. This is now fixed. Linux users also need to install some additional libraries, which is now documented.
Why would the timeline of your 30 FPS only play at 28.7FPS? Turns out it's a bug that was investigated and fixed by yuta0801! Now the playback during preview is smoother and the FPS counter is way more likely to display a number matching your desired FPS.
If a frame fails to render for some reason (such as calling delayRender() and never resolving the lock), this will now stop the rendering process. Previously you would get an error message but Remotion would keep trying and keep failing.
Previously during rendering, frames would be opened via file:// protocol and get screenshotted. Now the frames are being served on http://localhost:3000 (if port is not available, it will try 3001, 3002, etc.), which is the same behavior as in the preview.
Now APIs can now simply whitelist localhost domains in their CORS configurations, and you can more easily use those APIs to feed data into your video.
In case you missed it, I released a new tutorial showing the workflow of how to programmatically create Instagram Stories with dynamic content. You can watch it here.
Welcome to the release notes of Remotion 1.4! This is a big release adding support for more use cases and makes Remotion more stable, intuitive and robust.
Instead of just supporting H.264, you can now also encode a video in H.265 (HEVC), or as a WebM (in either VP8 or VP9 codec). These codecs will result in smaller file sizes, but have some trade-offs. To help you decide which codec to use, there is now an encoding guide in the docs. See also the
documentation for changing the codec in the config file
as well as in the CLI.
Did you know that Chrome and Firefox support video with alpha channels? Play the video and click the button below to dynamically change the background.
Remotion now has enough configurability to enable you to render transparent videos. There is a new documentation page for it, which also gives you guidance on how to render a fallback video for unsupported browsers.
Let's say you want to render 100 random particles in a video. A common mistake is to generate random values and store them in a state. The following is an anti-pattern in Remotion:
tsx
exportconstMyComp= () => {
// ⚠️ Bug! Random values will change during render
const [particles] =useState(() => {
returnnewArray(100).fill(true).map(() => ({
x: Math.random(),
y: Math.random(),
}));
});
};
tsx
exportconstMyComp= () => {
// ⚠️ Bug! Random values will change during render
const [particles] =useState(() => {
returnnewArray(100).fill(true).map(() => ({
x: Math.random(),
y: Math.random(),
}));
});
};
While this will work while previewing the video, during rendering, the random numbers will change during frames. This is because Remotion spins up multiple instances of Chrome and the random numbers will be different in each instance.
To help you avoid this mistake, there is now a new ESLint rule that will warn when you use Math.random(). Instead using it, you can use the new random() API. It will take a seed parameter and output a number between 0 and 1. The point of it is: As long as you pass the same seed, you get the same output! That way you don't get unintended effects while multithreaded rendering is performed.
tsx
import { useState } from"react";
import { random } from"remotion";
exportconstMyComp= () => {
// ✅ Pseudo-random values that will be same across threads
const [particles] =useState(() => {
returnnewArray(100).fill(true).map((_, idx) => ({
x: random(`x-${idx}`),
y: random(`y-${idx}`),
}));
});
};
Want to learn more? Read the new documentation page about using randomness.
Several new configuration options have been added as CLI flags, config file entries and to the SSR API:
setCrf() controls the tradeoff between quality and file size of the output file.
setQuality() allows you to control the JPEG quality of the frames rendered.
setCodec() allows you to select between 4 different codecs (as mentioned above).
setImageSequence() allows you to skip the stitching process and output only an image sequence
setImageFormat() allows you to explicitly select either PNG or JPEG as the format for the rendered frames.
setPixelFormat() has a new accepted value, yuva420p, which is necessary for transparent videos.
The addition of setImageSequence() and setImageFormat() as well as setCodec() makes the previous configuration options setOutputFormat() and --png obsolete. and they are therefore now deprecated. While they still work, we encourage you to use the new configuration options which are much more granular - for example now you can render a JPEG sequence if you wish to.
Thanks to an awesome pull request by Arthur Denner, keyboard navigation in the editor is much improved! Reading the PR is highly recommended because it's insightful and makes you realize that it's not hard to make a website keyboard-navigateable.
Don't be surprised if the newly added codecs are much slower than the default H.264. It's normal. But at least now you can always check the progress of the rendering!
Few people have rightly pointed out that the <Sequence> component will absolutely position it's children and there is no way to opt out of it. While we cannot change this now because of backwards-compatibility, you can now pass layout="none" as a prop to opt out of any layout influence that <Sequence> has.
There's a small breaking change in this release - delayRender works during the 'evaluation' phase. This is the phase where Remotion analyses your project and determines all compositions and does some validation. Watch out for delayRender() calls outside components, as they might block the evaluation phase now since no components are being rendered during that phase.
The benefit is that now your compositions can take in data that has been asynchronously fetched. For example the following is now possible:
While Remotion is primarily developed on macOS, other operating systems shouldn't have a sub-par experience or get bugs. While it does not replace manual testing, it helps that there are now some end-to-end tests for rendering videos and the test suite now runs on all 3 operating systems. Going forward, I will add more tests and contributors are also encouraged to do so.
In Remotion, you shouldn't specify the src as filepath string, but import the asset instead. To help you not make this mistake, there's a new ESLint rule:
Since Remotion will make money by selling licenses to bigger companies, it's only fair to give contributors their share as well! I have made offers to two top contributors so far to compensate them for their time spent so far and for potential future work. Gladly, they both accepted!
Some awesome pull requests came in, the most notable one adds audio support! We are also working on allowing you to customize Puppeteer parameters and making the installation process much faster by not downloading a copy of Chromium. Keep your eyes open for more major improvements coming soon.
Only 1 week after the initial launch, here is Remotion 1.3! In just 7 days, we have merged over 40 pull requests - just amazing! Let's go over the changes in this release.
2 days ago, the rendering time was cut in half, and in this release, we managed to half it again! Check out this benchmark of the Spotify Wrapped example:
Remotion 1.1
hyperfine --min-runs 5 'npm run build -- --overwrite --concurrency=16'
Benchmark #1: npm run build -- --overwrite --concurrency=16
Time (mean ± σ): 98.972 s ± 0.650 s [User: 123.329 s, System: 10.103 s]
Range (min … max): 97.951 s … 99.540 s 5 runs
hyperfine --min-runs 5 'npm run build -- --overwrite --concurrency=16'
Benchmark #1: npm run build -- --overwrite --concurrency=16
Time (mean ± σ): 98.972 s ± 0.650 s [User: 123.329 s, System: 10.103 s]
Range (min … max): 97.951 s … 99.540 s 5 runs
Remotion 1.3
hyperfine --min-runs 5 'npm run build -- --overwrite --concurrency=16'
Benchmark #1: npm run build -- --overwrite --concurrency=16
Time (mean ± σ): 17.921 s ± 0.224 s [User: 36.492 s, System: 3.482 s]
Range (min … max): 17.650 s … 18.264 s 5 runs
hyperfine --min-runs 5 'npm run build -- --overwrite --concurrency=16'
Benchmark #1: npm run build -- --overwrite --concurrency=16
Time (mean ± σ): 17.921 s ± 0.224 s [User: 36.492 s, System: 3.482 s]
Range (min … max): 17.650 s … 18.264 s 5 runs
From 98 to 18 seconds - that's 5.5 times faster! At the same time, we have reached an important milestone: This 19-second long 720p video was rendered faster than realtime. Granted, my computer is faster than most (8-core Intel i9-9900K chip), but still very impressive!
We achieved this performance gain through various Puppeteer rendering pipeline optimizations. Big shoutout to jeetiss who implemented a sophisticated performance optimization that doesn't require a page reload for each frame anymore.
Many options which you could pass in via CLI flags, you can now also add by adding a remotion.config.ts file in the repo. For example, if you want to increase the parallelism to the amount of threads you have and never want to write --overwrite, you can add the following to the config file:
You can see all the options on this page. The goal of making a config file in Typescript is to provide autocomplete, to easily highlight deprecated options and making it easier to show how to migrate in case the options change in the future.
The exports of Remotion have been cleaned up and the internal stuff has been moved into Internals. You shouldn't rely on these APIs are you are at risk of them changing over time.
Another example was added - Spotify Wrapped! This is a fully dynamic example where you can replace all data with a command line flag. There's a 2 hour tutorial on YouTube and the source code is on GitHub.
It turns out rendering each frame as JPEG is much faster than rendering them in PNG and results in no visible quality difference. Using this trick, the time of the 'Rendering Frames...' of an example video went down from 14 seconds to 6.5 seconds! That's more than twice as fast.
Windows support is very important (just like PHP). All the bugs that prevented proper Windows installation have now been fixed. Plus I now have a proper Windows setup so from now on Remotion will be tested on Windows as well!
What an extraordinary launch! In less than 24 hours, the Remotion announcement video has gotten more than 100'000 views on Twitter. The feedback was absolutely overwhelming!
Now it's time to iterate and make Remotion better. This release contains two new features: Customizing the Webpack configuration and new <Img> and </IFrame> components!
People had wild ideas on what to do with Remotion like importing MDX files or using React Native components. Now it is possible!
When providing the possibility on how to configure Remotion, it was of big importance to provide both a high degree of flexibility and a good developer experience. This is how you update the webpack config:
There is a new Remotion config file, that you can write in Typescript. Updating the Webpack config uses the reducer pattern: You get the default configuration and it is your responsibility to return an updated Webpack config. You get type checking, auto completion and the flexibility to either only update a single property or pass in a completely new configuration. No black magic here - since this is just a pure function, the outcome will be very predictable.
The purpose of these new components is to help with something that is easy to overlook in Remotion: Images or Iframes are being rendered, but Remotion does not wait until the loading of these network resources are complete. The result: Flicker in the end result! The correct thing is to wait using the delayRender API, but this is not very obvious. Now Remotion comes with built-in components that will wait until assets are loaded.
To prevent shooting yourself into your foot, Remotion now comes with an ESLint rule that warns if you use the native <img>, <iframe>, <video> or <audio> tags. These tags work better when you use the Remotion-wrapped versions instead.
in your project and you'll get all the newest Remotion packages! Maybe you also noticed that there is a banner in the editor that notifies you when an upgrade is available.
I've been using After Effects for many years, but it's always been a dream of mine to code my videos instead. In the React ecosystem, I am used to being able to take advantage of powerful composition, reusability, to be able to customize the experience for every user. To use scripts, linters and external dependencies to make my life easier as a coder.
So as a proof of concept I tried to make a trailer for my AnySticker app1 in React, and to render each frame using Puppeteer and stitch them together using FFMPEG.
The final result was a video that I thought was the best one I created yet. And I realized there was something to the idea.
This is my attempt to create a tool for the community that allows you to write videos in React. Obviously this is a huge undertaking, so this is not a product with hundreds of different features built in. Rather, following the React philosophy, this is an attempt to create a minimal fundament for rendering videos in React. Basically, you get a blank canvas, and you create your motion graphics using existing web technologies built into the browser and your favorite external libraries. Remotion is so minimal in fact, it consists of only 5-6 APIs that you need to learn to get started.
To get started is super easy. Assuming you already have Yarn, run: